Zenoss Core setup guide
Zenoss Core setup guide
Zenoss Core is a powerful monitoring system, and it is a OpenSource software.
Install Zenoss Core
Install ZenPacks
Setup snmp and snmpd config
Add user command
Add a single device
Add custom Device Class
Custom new class properties
Setup Processes
Custom Zenoss reports
Install Zenoss Core
Before you install:
1) Run the Yellowdog Updater, Modified (YUM), which you will use to install Zenoss. To run YUM, enter this command:
# yum -y install mysql-server.x86_64 mysql-devel.x86_64 net-snmp.x86_64 \
        net-snmp-utils.x86_64 gmp.x86_64 libgomp.x86_64 libgcj.x86_64 \
        liberation-fonts.noarch sysstat.x86_64 fping.x86_64
2) Download the Zenoss installation files.
# mkdir /opt/package
# cd /opt/package
# wget "http://downloads.sourceforge.net/project/zenoss/zenoss-3.2/zenoss-3.2.0/zenoss-3.2.0.el5.x86_64.rpm"
3) If you have just installed MySQL, then use the following command to add MySQL into the startup sequence:
# /sbin/chkconfig --add mysqld
4) Enter the following command to display current run levels:
# /sbin/chkconfig --list mysqld
5) If the system responds with something similar to:
mysqld 0:off 1:off 2:off 3:off 4:off 5:off 6:off
then enter the following command to adjust run levels:
# /sbin/chkconfig --level 2345 mysqld on
6) Restart MySQL and set the password.
Note:
Do not add a space between the single quotes in the following commands.
# /etc/init.d/mysqld restart
# /usr/bin/mysql_secure_installation
# /usr/bin/mysqladmin -u root password ''
# /usr/bin/mysqladmin -u root -h localhost password ''
Note:
Initially, the MySQL password must be blank so that Zenoss can correctly create the database. After you have installed and started Zenoss, you can change this password.
Install the Software
Follow these steps to install Zenoss for Red Hat Enterprise Linux 5 or CentOS 5.
1) Enter one of the following commands to install the Zenoss RPM.
# rpm -ivh zenoss-3.2.0.el5.x86_64.rpm
2) If MySQL is running on a different server, or has a different root user password, edit the /opt/zenoss/bin/ zenoss_init_pre file and adjust the MYSQLHOST, MYSQLROOTUSER, and MYSQLROOTPASSWD values.
3) Enter this command to start Zenoss.
# service zenoss start
Note:
This step may take several minutes.
Install ZenPacks
- Go to http://community.zenoss.org/community/zenpacks
- Download Zenoss 3.0 Compatible ZenPacks
like these:- HTTP Monitor
- DNS Monitor
- fping
- Jabber/XMPP Bot
- Zen JMX Collector
- Go to http://yourhost:8080/zport/dmd/editSettings
- Click ZenPacks
- Install ZenPack(choose egg file)
Setup snmp and snmpd config
add snmp.conf to zenoss server /etc/snmp/snmp.conf.
snmp.conf example:
defversion 3
defsecurityname yourname
defsecuritylevel authNoPriv
defauthtype MD5
defauthpassphrase yourpassword
add snmpd.conf to client /etc/snmp/snmpd.conf.
snmpd.conf example:
createUser yourname MD5 "yourlonglonglonglongpassword" DES
rouser yourname auth -V yourview

#                     sec.model    sec.name
group monitorGroup    usm         yourname

#       name          incl/excl    subtree         mask(optional)
view    yourview    included     .1.3.6.1.2.1
view    yourview    included     .1.3.6.1.4.1

#       group         context sec.model sec.level prefix read       write  notif
access  monitorGroup  ""      any       auth      exact  yourview none none

syslocation Undefined
syscontact NOC

# "Pass-through" MIB extension command
pass .1.3.6.1.4.1.2021.255 /usr/share/doc/net-snmp-5.3.2.2/passtest
Add user command for debug snmp setting
- Go to http://yourhost:8080/zport/dmd/dataRootManage
- Click "Add User Command"
- Input value
Name: snmpwalkV3
Description: snmpwalk using version 3
Command: snmpwalk -${device/zSnmpVer} -l authNoPriv -u ${device/zSnmpSecurityName} -A ${device/zSnmpAuthPassword} -a ${device/zSnmpAuthType} ${here/manageIp} system
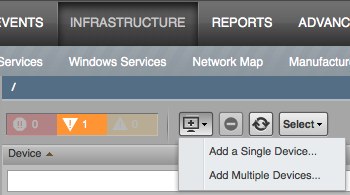
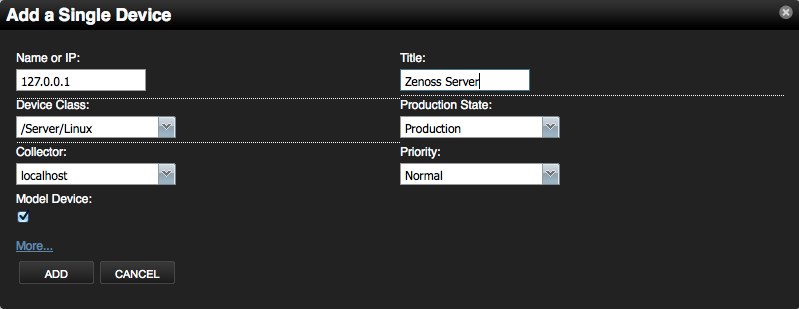
Add a single device
- Go to http://yourhost:8080/zport/dmd/itinfrastructure
- Click "Add a Single Device"
- Input items
- Click "Zenoss Server", and Click left "Configuration Properties" to edit the server’s properties
- zSnmpVer: v3
- zSnmpSecurityName: yourname
- zSnmpAuthPassword: yourlonglonglonglongpassword
- zSnmpAuthType: MD5
- Click "Commands –> snmpwalkV3" verify server and client snmp configuration
- Click "Actions –> Model Device"
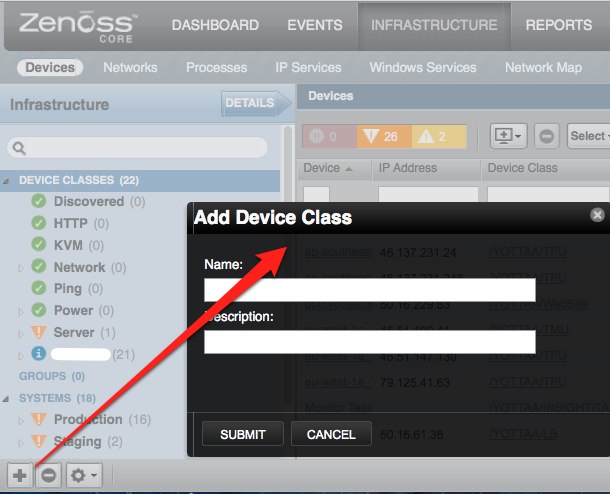
Add custom Device Class
Custom new class properties
using zenoss portal
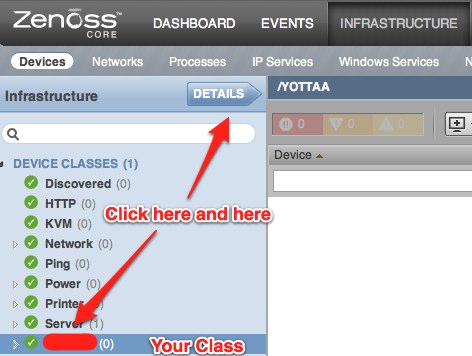
- go to the URL http://yourhost:8080/zport/dmd/itinfrastructure, click Your class name and click DETAILS
-
Configuration Custom Properties
- Modeler Plugins
- Configuration Properties
- Click "Actions" –> "Bind Templates"
using zenoss manage and zendmd
1) Login to Zenoss as "admin" and go to the URL http://yourhost:8080/zport/dmd/Devices/manage
2) Click left "your new class name", and click top "Properties"
3) To add a new property, enter a name, type and value for the new property and click the "Add" button.
Name: zCollectorPlugins
Type: lines
Value:
- zenoss.snmp.NewDeviceMap
- zenoss.snmp.DeviceMap
- zenoss.snmp.InterfaceMap
- zenoss.snmp.RouteMap
- zenoss.snmp.IpServiceMap
- zenoss.snmp.HRFileSystemMap
- zenoss.snmp.HRSWInstalledMap
- zenoss.snmp.HRSWRunMap
- zenoss.snmp.CpuMap
Name: zDeviceTemplates
Type: lines
Value:
- b_fping
- Device
- FileSystem
Name: zIcon
Type: string
Value: /zport/dmd/img/icons/server.png
Name: zSnmpAuthType
Type: string
Value: MD5
Name: zSnmpVer
Type: string
Value: v3
4) Login zendmd, change default snmp auth password
# su - zenoss
$ zendmd
>>> dmd.Devices.yourclassname.zSnmpAuthPassword = 'yourlonglonglonglongpassword'
>>> commit()
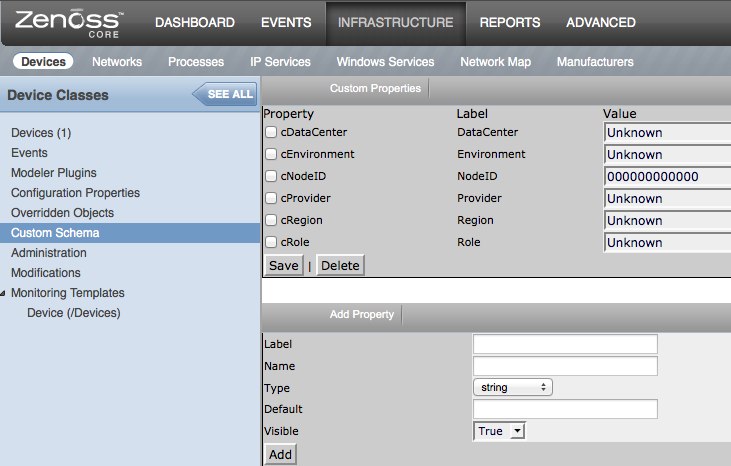
Add Custom Schema
- Go to http://yourhost:8080/zport/dmd/itinfrastructure
- Click "DEVICE CLASSES", and click "DETAILS"
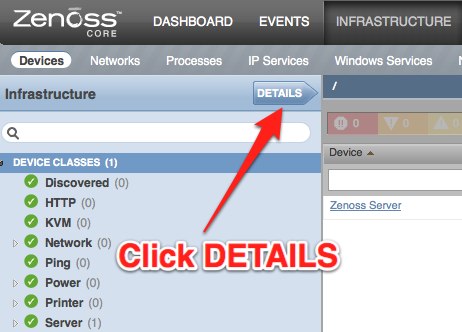
- Click "Custom Schema"
Add custom properties
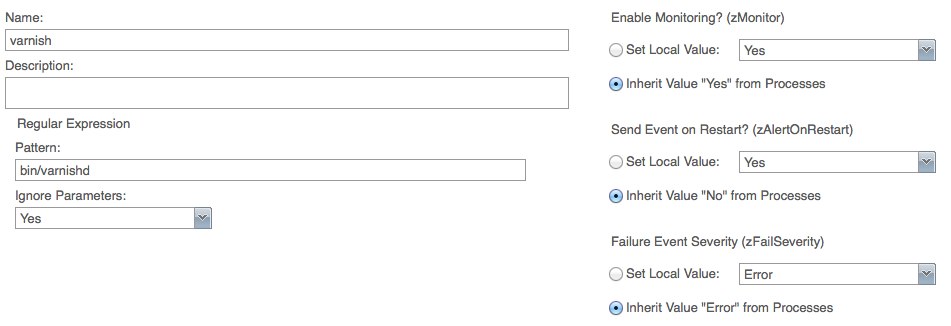
Setup Processes
- Goto http://yourhost:8080/zport/dmd/process
- Input your monitoring name
- Input Pattern, for example: /bin/varnish
Zenoss API
Zenoss have jsonapi and xmlrpc interface, you can using it’s API to integrate your management system.
jsonapi code demo:
def add_device(self, deviceName, deviceClass, title,
                productionState=1000, model=False):
    data = dict(deviceName=deviceName, deviceClass=deviceClass,
                title=title, productionState=productionState, model=model)
    return self._router_request('DeviceRouter', 'addDevice', [data])
xmlrpc code demo:
def add_device(self, deviceName, devicePath, tag):
    url = 'http://%s:%s@%s/zport/dmd/DeviceLoader' % (self.username,
            self.password, self.zenoss_host)
    serv = ServerProxy(url)
    serv.loadDevice(deviceName, devicePath, tag)
Custom Zenoss Reports
Column syntax
buildin command:
getId
python command:
python:str(dev.getRRDValue('ProcessInfo_FileDescriptor')).split('.')[0]
custom python script:
getMemUtil
Goto http://yourhost:8080/zport/dmd/Devices/manage first.
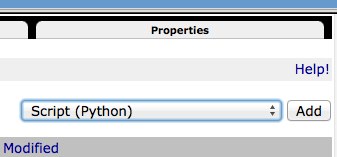
Input script name getMemUtil(), and input content like this:
total_memory = context.hw.totalMemory
mem_avail_real = context.getRRDValue('memAvailReal_memAvailReal')
mem_cached = context.getRRDValue('memCached_memCached')
if total_memory and mem_avail_real and mem_cached:
    print '%.2f%%' % ((total_memory - (mem_avail_real + mem_cached) * 1024) / total_memory * 100)
else:
    print('Unknown')
return printed
Send report email
cat  $ZENHOME/scripts/emailSummaryDailyReport.sh
#!/bin/sh
REPORTS_URL="http://yourhost:8080/zport/dmd/Reports/Graph%20Reports/Production/Production%20Summary%20Report/viewGraphReportClean/zport/RenderServer/render?width=500&drange=864000"
$ZENHOME/bin/reportmail \
--user=username \
--passwd= yourlonglonglonglongpassword \
--from="noc@foo.com" \
--address="noc@foo.com" \
--address="ops@bar.com" \
--subject="Zenoss: System Summary Daily Report" \
--url="$REPORTS_URL"
EOF
Add it into crontab
0 20 * * * /opt/zenoss/scripts/emailSummaryDailyReport.sh 2>&1 >/dev/null